The “White Box” of Death
You have spent hours crafting the perfect pitch deck. The data is solid, the fonts are clean, and the dark blue theme looks professional. Then, you paste your company logo or a product icon onto the slide.
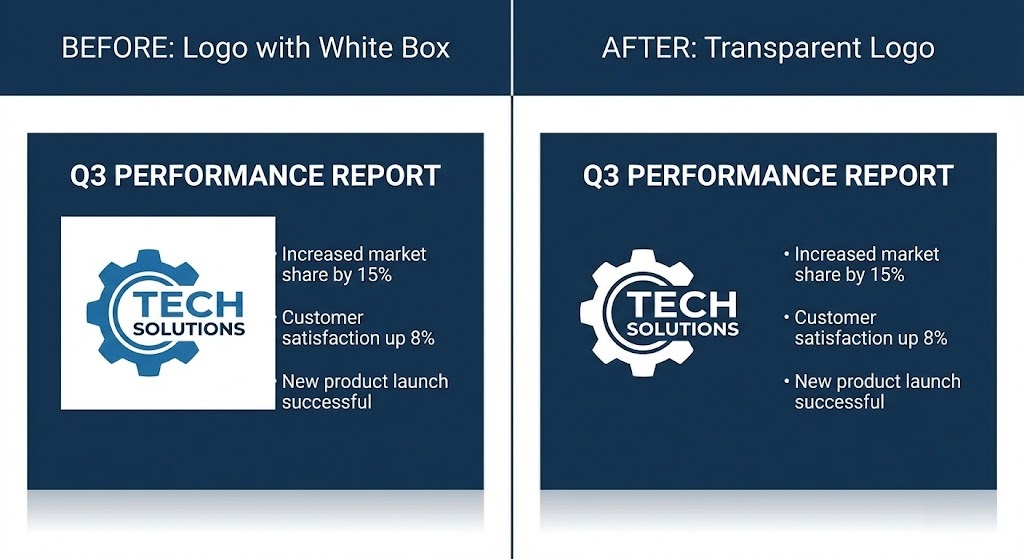
Disaster. The logo is trapped inside a giant white square. It blocks your text, clashes with your background, and instantly makes your presentation look like it was thrown together in 5 minutes.
This “white box” problem plagues millions of PowerPoint and Google Slides users every day. The solution is simple: you need a transparent background for PowerPoint. And with rmvbg.net, you can create one in seconds without opening Photoshop.
Why Does PowerPoint Do This?
It’s not PowerPoint’s fault; it is the image file’s fault. Most logos and icons are saved as JPEGs.
- JPEG: A “flat” format. It does not understand transparency. If an image has empty space, JPEG fills it with white pixels to keep the file size small.
- PNG: A “layered” format. It supports an Alpha Channel, allowing the background of the slide to show through the empty parts of the image.
To fix your slides, you need to convert that JPEG into a transparent PNG.
The “Set Transparent Color” Myth
PowerPoint has a built-in tool called “Set Transparent Color.” You might have tried it. You click on the white background, and it disappears.
But there is a catch: It usually looks terrible. It leaves jagged white edges (halos) around your logo, and if your logo has any white inside it (like the letter ‘O’), it deletes that too! It is a destructive, low-quality tool.
The Better Way: AI Background Removal
Using rmvbg.net is cleaner, safer, and looks professional on 4K projectors.
Step 1: Get Your Image
Whether it is a logo, a photo of your team, or a product shot, save it to your computer.
Step 2: Remove the Background
Drag the file into rmvbg.net. Our AI detects the subject and intelligently removes the background. Unlike PowerPoint’s tool, our AI creates “soft edges” (anti-aliasing) so the image blends perfectly with any dark or gradient slide background.
Step 3: Insert into Slide
- Download the HD PNG.
- In PowerPoint, go to Insert > Pictures > This Device.
- Select your new transparent file.
Design Tips for Pro Slides
Once you have mastered transparency, you can use these pro techniques:
- The “Cutout” Team Slide: Instead of boring square headshots, remove the background from photos of your team members. Place them standing next to each other at the bottom of the slide for a “Avengers-style” team lineup.
- Overlapping Text: With a transparent product photo, you can have your headline text slightly behind the product. This adds depth (3D effect) to flat slides.
- Iconography: Use transparent icons to create clean infographics. A white box around an icon ruins the flow of a diagram; a transparent one looks custom-made.
Works in Google Slides & Keynote Too
Because rmvbg.net gives you a standard PNG file, this trick works in every presentation software, including:
- Microsoft PowerPoint
- Google Slides
- Apple Keynote
- Canva Presentations
- Prezi
Conclusion
Your slides represent your personal brand. Don’t let a file format error undermine your credibility.
Use rmvbg.net to ensure every asset in your deck has a crisp transparent background for PowerPoint. It is the secret weapon of top management consultants and designers. Upgrade your presentation today.